Tag Archives: portrait photography

RE: Business fair images

I have decided that I would like to create an exhibition out of the images taken at the business fair for my Freelance Practice module. 

On editing these images to prepare I realised that the use of colour in these images is futile. I don’t need the extra dimension that the colour adds. I feel it over complicates the work and that the reactions, the tones and the shadows generated by the minimal lighting are the key focus points here. 

Here are a few I have transformed into black and white:

Image

ImageImage

I am hoping to continue this kind of work by creating a similar small studio set up at the exhibition to create some more ‘reactions’ work. If its a night event, possibly tequila shots (adults only obviously).

I will get back to you with some follow up images! 

Tagged , , , , ,

Portrait Lenses for Medium Format

As I know I’m going to be shooting with medium format for my current project I thought it might be wise to look into the advised lenses to use in medium format portrait photography.

Now because medium format is a larger frame than your 35mm camera you need to allow for this with the lens. For example:
If a 50mm focal length lens is projecting the scene onto an area 24mm high × 36mm wide (the size of a full-frame 35mm exposure), a certain amount of the scene will be recorded.  If a 50mm focal length lens is projecting the same scene onto an area 56mm high × 56mm wide (the size of a 6×6 or 2¼” square frame), obviously a much larger amount of the scene will be recorded (more than three and a half times as much). So, while a 50mm lens on a 35mm camera produces what we might call a “standard” field of view, a 50mm lens on a 6×6 camera produces a wide-angle field of view.

A portrait lens usually is 100 mm to 150 mm for a 35mm camera or standard DSLR and gives a sharp, clear image of your subject while capturing a soft out-of-focus backgrounds. For medium format this translates into the 75-80mm lens. 

Here are a few examples of images shot using 80mm lenses on medium format 120 film cameras:

Image
G
logson, Portrait (2012 Poland).

Image
K
ay Yang, Juri #2. Portrait (2012 Vancouver)

Image
A
nna Kharina, Hitler/Chaplin?, 2009 (Flickr)


Tagged , , , , , ,

Business Inovation Fair, 12/12/12 @ 12pm reaction portrait photography

I created a stall for the business innovation fair with the idea behind me that in terms of creating a career for myself in photography I would like to start up a “real” portraiture service. I would collect emotions, reactions, whatever, gaged on their chosen activity if they could not choose I would choose something for them. Making your everyday family photographs more character based that a staged, dodgy backdrop do.

I set up my stall with a makeshift studio next to it and brought different sized and kinds of cake and scolding hot tea. The idea was to put the entire cake in your mouth or sip the roasting hot tea (not may opted for this, unsurprising, but good effort those who did!) and I would capture the various reactions on camera.

My table was often crowded and it seems most of us will do just about anything for a free slice of cake!

Here is a small selection from today, unedited:

Image

ImageImageImageImageImageImage


The lighting setup I used is on the diagram below:

lighting-diagram-1370040855


It is basically a rembrandt light set up using a soft box but there was a quite a bit of ambient light in the room also. You don’t get the full rebrandt affect, if at all due to the subjects constant movement.

Tagged , , , , , ,

Lighting Techniques: Loop light

Loop Lighting is an excellent technique to helps broaden the face and works exceptionally well with long or narrow faces. The loop from the nose area should not touch the shadow area on the side of the face. Your Key Light should be lower than that used with Paramount Lighting and moved in closer toward the background. The Fill Light should be even with the camera and up higher while remaining opposite your Key Light.

Loop Lighting gets its name from the loop-shaped shadow that it creates under the nose, and this is one of the most frequently used lighting patterns because it is considered to be one of the more flattering and adaptable pattern.

Loop Lighting is easily achieved by positioning your key light high and to the side of your subject.

ImageImage


IMG_9823


I had a go at this lighting set up myself. I think I have aligned the lights too similar to one another so you are missing the darker shadows. My lights are possibly too high also


Tagged , , ,

Lighting Techniques: Butterfly light

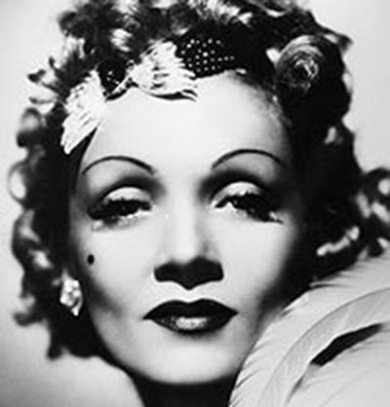
Butterfly light is considered to be the most flattering and artistic way of lighting a portrait subject. As it’s name would denote, Butterfly Lighting is created by the way in which you angle the light to fall on the face of your subject. This style of lighting can be achieved by a single off camera light and a reflector.

Here’s a step by step guide of how to achieve perfect butterfly lighting from the Digital School of Photography website:

1. Face your subject at 7.8 view: Start by facing your subject directly to the camera, then turn the head just to hide the far ear. This view of the face is most flattering as it minimizes the face.

2. Hold your off camera flash 1′ above your subject, and 3′ toward the front to eliminate any possible shadowing on the face. You will also create a shadow beneath the chin, thus hiding any excess weight there.

3. Place a reflector just below the edge of your frame. The closer your reflector is to your subjects chin, the more even the spread of light. This reflector will soften that shadow and eliminate a harsh contrast.

4. Light for catch lights: You want your subjects eyes to be well lit and fortunately, with the angle of your main light in front/above, and the fill light coming in from below, your subject should have large round catch lights in both the bottom and top part of the eye.

For such beautiful results, Butterfly Lighting is among the most simple of the “directed” studio lighting options. As you can see, Butterfly Lighting will yield gorgeous results, without a great deal of precision or drama.

Read more: http://digital-photography-school.com/how-to-achieve-perfect-butterfly-lighting#ixzz2Uud63ZQ2

ImageImage


IMG_9802

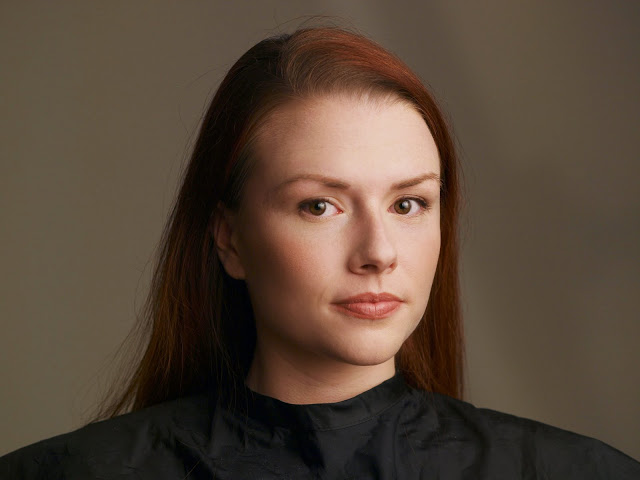
This is the image I created. I set up the lighting exactly as I should have but could not seem to get the dramatic effect you see in the example image.


Tagged , , , ,

Lighting Techniques: Broad light & short light

Broad lighting is when the subject’s face is slightly turned away from centre, and the side of the face which is toward the camera (is broader) is in the light. This produces a larger area of light on the face, and a shadow side which appears smaller. Broad lighting is sometimes used for “high key” portraits. This type of lighting makes a person’s face look broader or wider (hence the name) and can be used on someone with a very slim face to widen it. Most people however want to look slimmer, not wider so this type of lighting would not be appropriate for someone who is heavier or round faced.

Image

Image


IMG_9801

Here is an image I created myself.

In contrast to this lighting set up there is also short light.

Image

Short lighting illuminates the side of the facefarthest from the camera and part of the near side as well. Because this creates shadows on the cheek facing the camera, it not only introduces tonal variety and contrast to the shot, but also appears to “shorten” or narrow the face, making the model look more slender.  Short lighting encompasses many more specific styles, such as  split, loop, and some Rembrandt setups and is particularly popular when lighting young women. However it does have the disadvantage of accentuating wrinkles and imperfections in the skin, especially when compared to its sister, broad lighting.

Image

Tagged , , , ,